Open topic with navigation
Step 8 – Processing
Marker-based session
- After the files have been labelled, apply any gap-filling that may be required (use Batch Processing if required – make sure that only Gap Filling is checked and no other processing steps). The Visual3D script will provide gap filling up to 10% of the frame rate.
-
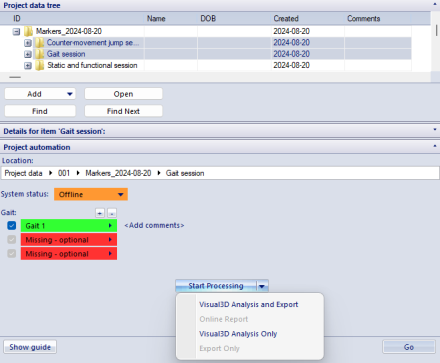
When the minimum number of files has been captured (one static, one functional hip/knee, one Fastball pitch), the Start Processing button is automatically activated:
- When the button is clicked, QTM automatically exports any file that has its checkbox checked to c3d and runs the first pipeline in Visual3D (building the model and calculating the functional joint centre).
- Visual3D will use Inverse Kinematics to determine the arm positions (this might take one or two minutes depending on number of pitches).
-
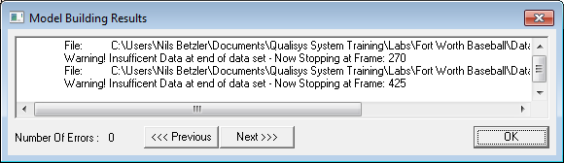
If there are gaps in the data, there will be a warning in the Model Building Results. It is important that gaps only appear before the movement starts or after ball release – otherwise the arm angles cannot be calculated correctly. Click OK. The Visual3D report will now be generated.
-
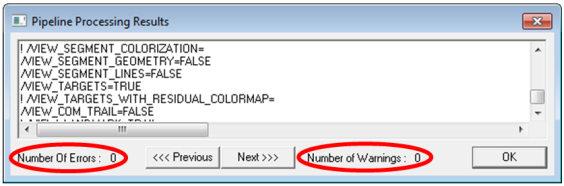
The Pipeline Processing Results should show no errors or warnings. If these occur, it usually indicates that the ball was not visible, or that an event was not created or not identified because of gaps in the data. In that case, close Visual3D and check the files for any incorrect labels or gaps. You can use the output in the Pipeline Processing Results to determine which file caused the error/warning. If the problem persists, copy the text from the Pipeline Processing Results into a text file and send them to Qualisys.
-
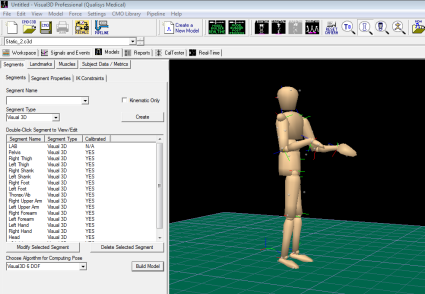
Switch to the Models tab to check that the model was built successfully and that the functional hip/knee joint centres are at approximately the same height. If they are not, close Visual3D, check the Functional hip/knee trial and fill any gaps/re-label if required.
Markerless session
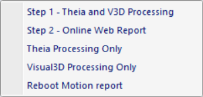
For markerless session, processing is done automatically in two consecutive steps. Processing starts with Theia3D by processing all videos and creating primary c3d files. Then Visual3D will open and merge c3d files created by Theia3D with c3d files containing analog data created by QTM and Visual3D report is generated. When needed, Step 1 can be run in two separate steps by using 'Theia Processing Only' and 'Visual3D Processing Only' or 'Visual3D Processing Only Hitting'.
Note that capture rate for bat markers can be higher than capture rate of videos but it must be an integer multiple of video rate.
Theia3D behaviour can be modified by settings files located at [your project]\Templates\Assets\Theia\. The list of options is extensive but only a few settings are important:
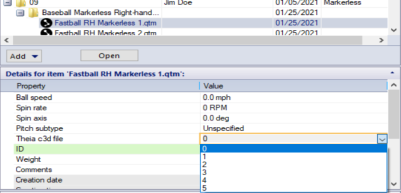
Theia can identify and process data for more then one subject if more persons are in the volume. The subject that yields best data is typically selected but sometimes other person is wrongly chosen. If that happens, there is an option to choose which c3d file is actual subject. To select other c3d, activate the measurement, navigate to 'Theia c3d file' field and chose number of Theia file. To find out what c3d files Theia has created, go to working directory of active session, open 'TheiaFormatData' folder, open folder of active measurement and review 'pose_filt_*.c3d' files in Visual3D.
Filtering and force assignment
Filtering can be set in [your project]\Templates\settings.php. There are two ways how to filter markerless data:
-
Theia filter can be set separately for pitching and hitting by changing cutoff frequency for $theia_filter_cutoff_hitting or $theia_filter_cutoff_pitching. Note that frequency below 20 Hz will cause attenuation and may result in segments to disappear. Read more about attenuation here. Therefore we recommend to keep this filter at 20 Hz or higher.
-
Additional filtering can be set by other parameters in settings.php. It is possible to set separate filter for markers, angular velocities, moments and forces (see parameters $marker_filter_fq, $angular_velocity_filter_fq, $moment_filter and $force_filter. Default values for markerbased is 24 Hz, for markerless pitching 12 Hz, for markerless hitting 8 Hz. Set it to 0 to skip filtering.
In rare cases automatic force assignment in Visual3D might fail due to distance from the COP of the force platform to the foot's center of mass exceeding default value of 0.2 m. Note that the default value that can be set in Visual3D is being overwritten by module to avoid situation that user sets it to unreasonable value and analysis module fails to assign forces to segments. Therefore module ensures that value for Segment to COFP Distance is always set to 0.2 m. If user wants to change the default value, it must be done in [your project]\Templates\settings.php > $segment_to_COFP_Distance and not in Visual3D. The setting in settings.php is not changing default Visual3D behaviour when Visual3D is used separately from analysis module.
Events
Some events can be defined manually in QTM. It is useful when automatic defection is not accurate enough. If manually defined event is found, automatic detection is skipped. See Appendix A for details on event definitions.
| Pitching |
Setup |
| Footstrike |
| Block |
| Release |
| Hitting |
Setup |
| Lead_Foot_Off |
| Lead_Foot_Down |
| Lead_Foot_Flat |
| Contact |
| Softball |
Setup |
| Lead_Leg_Footstrike |
| Back_Leg_Footoff |
| Release |
Batch processing
Since QTM version 2026.1 it is possible to do batch processing in PAF pane. Batch processing will execute chosen analysis from 'Start Processing' menu on all selected sessions/subsessions. To use batch processing, Ctrl+click desired sessions/subsessions and while multi-selection is still active, click small arrow next to "Start Processing' and select analysis type. Note that only sessions/subsessions that contain the same analysis type will be processed.
Note: When using batch processing on analysis type that includes Visual3D processing, parallel processing of Visual3D can run on number of Visual3D instances that is not larger than number of CPU cores.